Next.js "New Post" Node Script
September 13, 2021

I use this tool to help start new posts for Next.js, but you could do something similar for Gatsby, Eleventy, Hugo, etc... I mostly wanted a quick way to genearte a new post so that I can reduce the amount of time to start writting content!
Quick 1 Minute Video Tour
Before we unpack how it's made, here is a quick 1 minute tour video of how it's setup and what it looks like when running.
Package.json and Starting Script
I added a custom npm script to my package.json file called new-post that
runs a local Node program.
{
  "name": "elijahmanor.com",
  "scripts": {
    "new-post": "node ./lib/new-post"
  },
  "devDependencies": {
    "inquirer": "^8.1.2",
    "inquirer-datepicker-prompt": "^0.4.2",
    "open": "^8.2.1",
    "slug": "^5.1.0"
  }
}
In order to run the custom npm script, you can execute the script npm run
new-post from the command line.
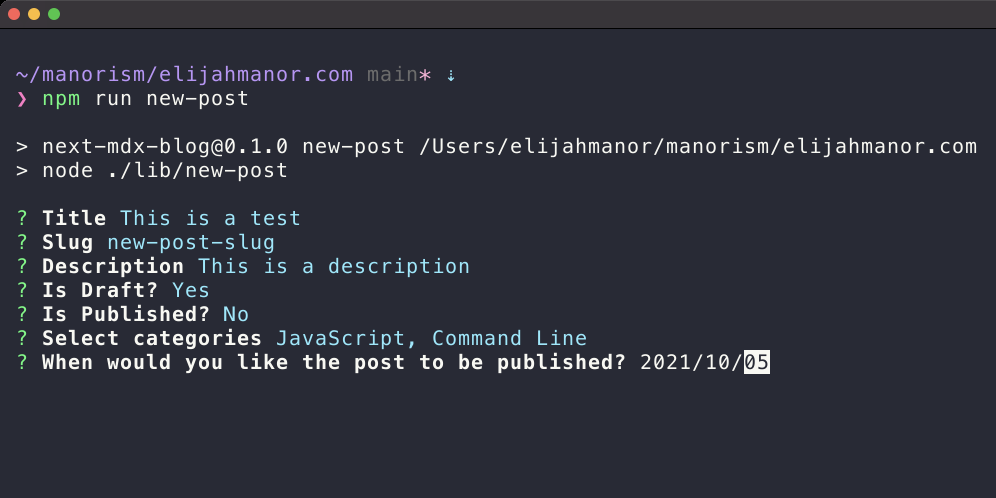
npm run
new-post
Development Dependencies
The above package.json snippet shows the special dev dependencies that I use
in my Node program.
slug- Slugifies strings, even when they contain Unicode. Make strings URL-safe.inquirer- A collection of common interactive command line user interfaces.inquirer-datepicker-prompt- Datepicker plugin for Inquirer.jsopen- Open stuff like URLs, files, executables. Cross-platform.
You can install these dependencies from the command line using either npm or
yarn.
npm install -D open slug inquirer inquirer-datepicker-prompt
yarn add -D open slug inquirer inquirer-datepicker-prompt
Breaking Down the JavaScript
High Level Overview
From a high level, the Node scripts does the following.
- Requires the dependencies (listed in the previous section)
- Prompts the user for specifics about the new post
- Takes the answers and...
- Generates a new
mdxfile with frontmatter - Creates an associated image folder
- Open the browser to preview the post
- Generates a new
const fs = require("fs");
const slugify = require("slug");
const inquirer = require("inquirer");
const open = require("open");

// Register datepicker plugin for inquirer
inquirer.registerPrompt("datetime", require("inquirer-datepicker-prompt"));

inquirer
  .prompt([
    { type: "input", name: "title", message: "Title" },
    // ... other propts for desc, slug, date, categories, draft, etc ...
  ])
  .then(answers => {
    const { slug, date, title, desc, categories, draft, published } = answers;
    // ... take answers and create post, images folder, and open browser ...
  });
NOTE: You can download the full script from GitHub;
Inquirer Prompt Types
The inquirer module has many default Prompt
Types available to use
such as list, rawlist, expand, checkbox, confirm, input, number,
password, and editor. In addition to these you can leverage external
Plugins.
Input Type
I use the input prompt type to request for the Title of the blog post along
with Slug and Description. For the Slug field, I grab the value entered in for
title and run it through slugify to provide the default value for that
field. The user can change the value if they want, or take the default option.
{ type: "input", name: "title", message: "Title" },
{
  type: "input",
  name: "slug",
  default: answers => slugify(answers.title.toLowerCase()),
  message: "Slug"
},
{
    type: "input",
    name: "desc",
    message: "Description"
}
Confirm Type
For my blog posts I have the idea of a draft version that is only available in
development and a published version that is listed on my blog and included in
the RSS feed. I use the confirm type to ask about these fields and can
provided a default answer.
{ type: "confirm", name: "draft", default: true, message: "Is Draft?" },
{ type: "confirm", name: "published", default: false, message: "Is Published?" }
Select Type
In order to capture the categories of the blog post, I use the checkbox prompt
types and provides an array of choices. This prompt supports a validate function
where I can enforce at least one category has been selected from the list.
{
  type: "checkbox",
  message: "Select categories",
  name: "categories",
  choices: [
    { name: "JavaScript" },
    { name: "React" },
    { name: "CSS" },
    { name: "Comic" },
    { name: "Neovim" },
    { name: "Vim" },
    { name: "Command Line" }
  ],
  validate: answer =>
    answer.length ? true : "You must choose at least one category"
}
DateTime Type
One last field that I capture is when I want the blog post to be published.
Technically I control when the item is published since this is a static site,
but this is the date that is displayed on the post and it controls the sorting
of blog posts. The inquirer
doesn't natively have a Date prompt type, but I was able to use the
inquirer-datepicker-prompt
external plugin to capture the published date.
{
  type: "datetime",
  name: "date",
  message: "When would you like the post to be published?",
  format: ["yyyy", "/", "mm", "/", "dd"]
}
Abort if Post Already Exists
Once the information from the user has been gathered, I wanted to make sure that
I wasn't going to overwrite an existing blog post at the same location, so that
is the first thing I do. If I find a post with the same slug, then I abort the
script and let the user know.
if (fs.existsSync(`/posts/${slug}.mdx`)) {
  throw "That post already exists!";
}
Write New Post & Create Images Folder
If the blog post is indeed unique (it doesn't already exist), then I go ahead and gather up the frontmatter for the post and write the file in the apropriate location. In addition, I create a folder in the public folder in case I want to add any images for that post.
fs.writeFileSync(
  `posts/${ slug }.mdx`,
  `---
slug: "${slug}"
date: "${date.toISOString()}"
title: "${title}"
description: "${desc}"
categories: ${JSON.stringify(categories)}
draft: ${draft}
published: ${published}
---

## Introduction
`);

fs.mkdirSync(`public/images/${slug}`, { recursive: true });
Launch the Browser to New Post
The last thing that the script does is to open a new browser tab to where the
new post is located. I use the open node module to do this is a cross-platform
sort of way.

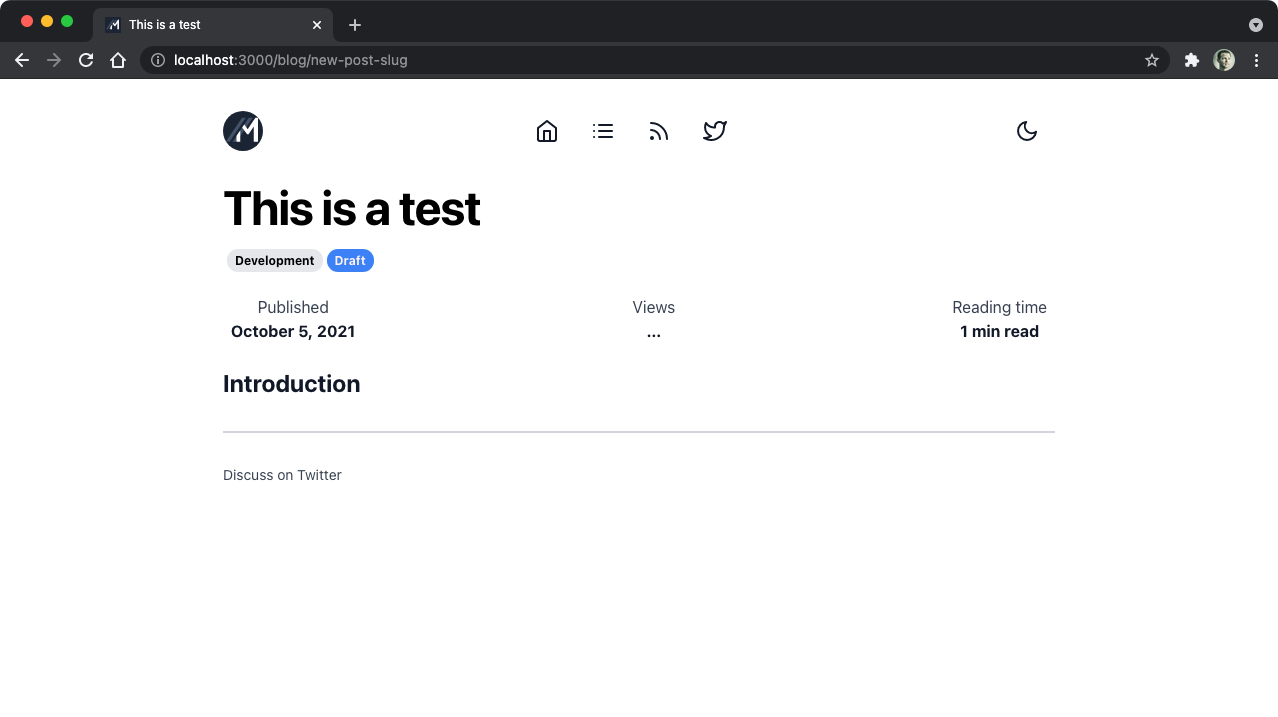
open(`http://localhost:3000/blog/${slug}`);
Comment and Share
NOTE: You can download the full Node script described in the above post from GitHub;
If you found this post helpful, please consider sharing on Twitter.
Also, do you have a method to create new posts on your blog? Do you capture other fields other than the ones that I mentioned? If so, I'd love to hear about it! Feel free to join the discussion on Twitter.
Tweet about this post and have it show up here!